Kids are always attracted to crystals. Whether they come as sparkling pendants or as sugar candies, these translucent shiny objects are a source of amusement for them. It will be great fun to make several types of crystals at home, right? It is an activity that the entire family can do together. A growing crystals science fair project always stands out in every science fair. So let us find out some crystal growing recipes.
Crystal needles: Best in growing crystals science fair project
Making crystal needles grabs the first position among all crystal projects because of its ease of doing. Also, the end-product looks exceptionally wonderful. A jar full of colored needle crystals is something that you can proudly present in any science fair. Let us see how we can make needle crystals.
What we need
Epsom salt (magnesium sulfate) – ½ cup
Hot water – ½ cup
Food coloring – Any color (blue is my personal favorite)
Transparent bowl – 1
Procedure
- Heat the water over a stove or in a microwave.
- Pour the hot water into the bowl. (Take help from an adult)
- Add Epsom salt to the hot water.
- Stir well till the salt entirely dissolves in water. The resulting liquid will be a saturated solution which means that no more salt can dissolve in the water.
- Add a few drops of the food color to the solution.
- Keep the bowl in the refrigerator for some time.
- Check after a few hours. You will find that the bowl is filled with needle-like thin crystals. Transfer the needle crystals to a glass container with a lid. Now you are ready for showing off your crystals at the science fair!
Explanation
As simple this project is, so is its explanation. Epsom salt or magnesium sulfate is soluble in water. When we heat the water, the space between the molecules increases. As a result, it can dissolve more salt. In the saturated solution, the salt molecules will be tightly packed.
When the saturated solution is rapidly cooled, the space between the magnesium sulfate molecules reduces. They bump into each other, join together and start forming crystals. As the process happens very fast, salt crystals form into long needle-like shapes.
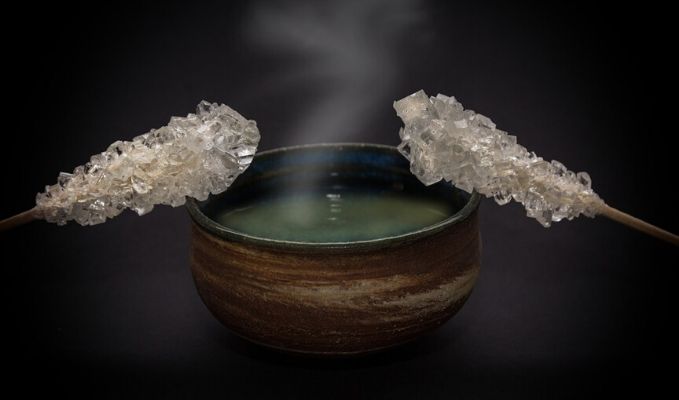
Making crystal candies
Growing crystals science fair project becomes much more interesting when we are able to eat the crystals that we grow. Making rock candy sticks is an activity that satisfies your science project requirements as well as your sweet tooth. This project needs a few things readily available at home, and a little patience too.
What we need
Sugar – 6 cups
Water – 2 cups
Food coloring – 3 to 4 colors
Bamboo or wooden stick – 4 to 5
Cloth peg – 4 to 5
Plain glass – 4
Procedure
- Add sugar to the water and stir well.
- Heat the water over the stove or in a microwave. (Take help from an adult for this step). Keep adding more sugar till it no longer dissolves in the water.
- Allow the saturated sugar solution to cool for 15 to 20 minutes. If there are any undissolved sugar crystals at the bottom of the vessel, pour the solution through a strainer and make sure that you have a clear liquid.
- Pour the sugar solution into the four glasses. Add a few drops of different food colors into all the glasses.
- Spread some sugar on a paper or plate.
- Dip the sticks in the sugar solution. Now roll the sticks over the sugar spread on the plate.
- Keep the sticks aside for a while so that the sugar crystals will attach well to the stick and dry completely.
- Once the sticks are dry, dip the sugar-coated sticks in the water in the glasses.
- Make sure that the stick is suspended in the water without touching the sides of the glass. For this, we can take the help of cloth pegs. Pinch the free end of the stick with the cloth peg. Now you can rest it over the glass in such a way that the stick remains suspended in water.
- Keep the glasses in a place without any disturbance. Leave them for a week before checking the growth of your sugar candy sticks.
- After a week, take out the sticks and see a sugar candy formed around it, in all different colors that you love! Resist the urge to gobble them up before presenting your project.
Explanation
The process that we saw here is caused due to some science principles. When we heat water, inter-molecular space of water will increase and therefore it can hold more sugar. We dissolved as much sugar as possible in the heated water. This created a super-saturated solution, which is unstable.
As the temperature of the water decreases, inter-molecular space decreases and the sugar molecules are forced out from their liquid state to form solid crystals. They cling to the sugar crystals around the stick. In a few days, you get your candy stick. You might need to occasionally stir the solution in order to break the solid layer that might form on the surface.
Now you might be thinking why sugar sticks to a solid surface. This is because of the higher concentration of sucrose molecules, which causes higher H-bonding. Learn more about the reasons why sugar syrup is sticky here.
Growing crystals science fair project: A real flower crystal
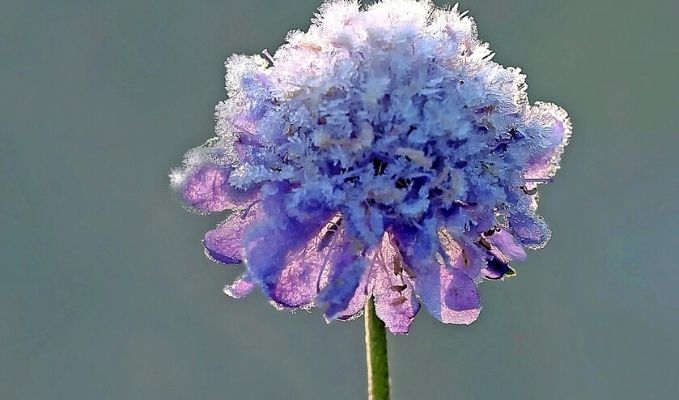
We saw how to make needle-shaped crystals and candy crystals. Now let us give an aesthetic look to our crystals by crystallizing real flowers. This will not only give an appealing look to your project, but will also add to the beauty of your flower vase. As with the other projects, you need a few basic things for this project. You can crystallize any fresh or dried flower depending on your choice. If you select one with a strong stem and lesser number of petals, the results will be better.
What we need
Any fresh or dried flower
Borax (sodium borate)
Water
Transparent glass jar/ glass
Food coloring (optional)
Pencil or long stick
String
Procedure
- Heat water over the stove or in a microwave. (Take help from an adult)
- Add the borax powder to the hot water and keep stirring. Keep adding till the point where no more borax will dissolve in the water. Now we have made a saturated solution.
- Pour the saturated solution into the jug or glass. Add food coloring if needed. (Even if you don’t add color, borax will absorb the natural colors of the petals. So your flower will eventually look colorful)
- Tie one end of the string to the flower stem, and the other end to the stick or pencil.
- Place the stick over the jug and immerse the string with the flower into it. The flower should be completely immersed in the water.
- Keep the flower in the borax solution for a few hours.
- Take out the flower after a few hours and see the crystals formed over the petals. You are now ready to present the project, or to decorate your vase.
Explanation
The science behind borax crystals is the same that we saw in the previous projects. Borax or sodium borate is a chemical that dissolves in water. By heating the water and dissolving borax in it, we created a saturated solution. When the solution cools down, the inter-molecular space lessens. As a result, the borax dissolved in the water finds less space. It starts clustering up as crystals over the flower petals.
Caution: Although borax is considered as a safe chemical, it may be harmful if swallowed. It can also cause skin rashes or irritation.
Making crystal egg geodes
A geode is a rock with minerals or sediments attached to it in the form of crystals. Some geodes have a shiny appearance which make them look like they have come from outer space. We can make artificial geodes by crystallizing egg shells. Though they are no match for the real ones, egg geode is a good option for your growing crystals science project.
What we need
Egg shells
Egg dye (optional)
Craft glue
Food color
Water
Cup or bowl
Funnel
Epsom salt (Magnesium sulfate)
Procedure
- Crack the eggs near their narrow end. Empty the egg white and yolk. Make the opening large enough to pour water and other contents.
- Wash the egg shell with hot water. Rub your fingers inside the shell to remove the egg membrane. (This is very important for making a good geode)
- Allow the egg shells to dry. If you wish your geodes to look colorful from the outside also, color them with the dye of required color.
- Squirt a few drops of glue inside the egg shells after they dry up. Spread it evenly inside the shells.
- Sprinkle some Epsom salt inside the shell and spread it so that a thin crystal coating is formed inside the shell. This will be our starter for making geodes.
- Heat the water over stove or in a microwave. (Adult supervision is recommended)
- Add Epsom salt to the water. Stir well and continue adding more salt till the water cannot dissolve more of it. We have now got a saturated solution.
- Add a few drops of food color to the water.
- Place the egg shells in a bowl with their opening facing up. Use the funnel to fill the egg with saturated water.
- Leave the eggs for a days. Check for the formation of crystals after a few days. If the crystals are formed inside the egg, you can throw the remaining water. You have a shiny crystal geode in hand.
Explanation
The formation of Epsom salt crystals is similar to the formation of other crystals. The cooling of a saturated solution will reduce the inter-molecular space and push the salt molecules back to their solid state. They form crystals and attach to the inside of egg shells.
Growing crystals science fair project can be done in many more ways. The above mentioned are the best and easiest ones. Are you looking for more science projects? Head to our Projects section.